Creating a website from scratch is not an easy thing to do. You would either need coding experience or hire a developer. After all the money spent, creating a website from code can take months to be ready for publishing. You can make your life easier with Strikingly. Yes, you can create a website with Strikingly by choosing among responsive and attractive pre-made templates or creating your own.
With Strikingly's website builder, your site will be ready in a few minutes. It would be fully responsive, meaning it will be suitable to view across all devices, and it will look gorgeous regardless of screen size. The best part is, you can save yourself from spending hundreds to thousands of dollars if you build a website with Strikingly.
 |
| Create a Website With Strikingly: A Guide for Beginners |
Here’s a step-by-step guide to building a website using Strikingly.
1. Create Your Account
Go to the Strikingly website and enter the details it will asks for signing up–your first name, email, and password. Click on “GET STARTED.”
Signing up is totally free. You can also upgrade and take advantage of Strikingly’s 14 days free trial.
2. Select The Template
After signing up you will be navigated to the select templates page.
Here, you can either select from a list of customizable templates or go for a blank page to start designing from scratch. Ensure that the template you picked goes well for the kind of site you’re building and your brand’s personality.
 |
| Strikingly Templates Options |
After selecting the template you will be taken to the site editor.
3. Add Sections
Strikingly editor makes designing your website ridiculously easy. Once you’re in the editor you can start by entering your name (or your company’s) and logo at the top. Strikingly picks up your brand’s theme using your logo. Adding it first will guarantee that the overall theme of your website matches that of your brand.
Next, add sections to make your site well-structured.
 |
| Add Sections Menu |
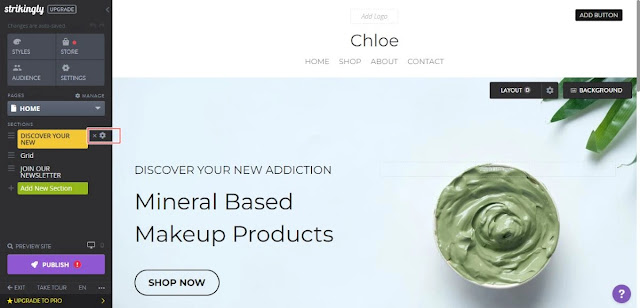
You can choose what you want your navigation menu to look like. You can delete an already existing section by selecting it and clicking on the “x” right next to it. Or you can rename sections by clicking on the gear icon beside the section name. To rearrange sections, click then drag them from the three lines visible on the left of each section.
Tap on the green button that says “Add New Section” to reveal all the types of sections you can add.
Ecommerce Store
The online store segment will enable you to list your products and make them available for purchase on your website. Simply tap on the “commerce” option to add it to your site.
 |
| Add Products to the Store |
Clicking on “ADD PRODUCT” will take you to a window. You can add the category, name, price, description, and image of your product or service there.
Bookings
You can also include a booking section. Just like the online store, you need to tap the “add events” button after the bookings section on your site. Then, click on the green button saying, “add event type.” Enter the required information and done!
Blog
 |
| Manage Blog Post Window |
If you plan to create a blog, you can add it from the section menu. On hovering the mouse over the blog portion on your site, you’ll see a “manage blog posts” button. That will button take you to a window from where you can create new blog posts, save them as a draft, and preview them in phone and desktop sizes.
4. Style Your Site
You can style your site by going into the styles menu in the top left corner. You can also change the template without worrying that you may lose your content. There’s nothing technical about this; you can play around with different font styles, colors & sizes, color schemes all across the website, and many other things.
 |
| Style Menu |
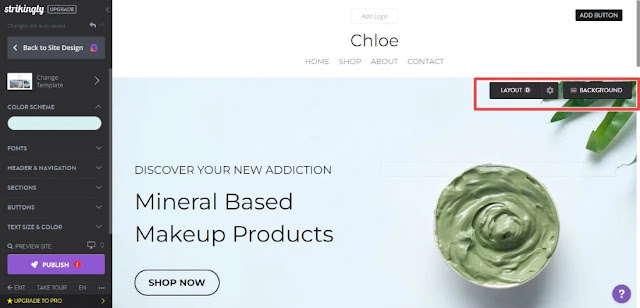
To change the background you’ll see the option at the top-right corner of each section. You can set it to custom or predefined colors, images, or videos.
Add images and videos you would like to showcase by including the “image & videos” section.
5. Contact Forms and Social Media Page
You can add contact forms and social media pages to stay in touch with your audience from the “add new section” menu. Select contact & forms. For social media, the page selects the contact section.
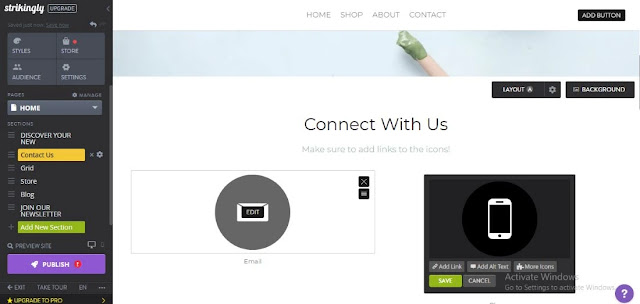
Click on the “edit” button which will show up when you hover your mouse over the icon. You can add the link to your social media pages, change icons, and add alt text.
 |
| Manage Social Media Page |
For a “Contact Us” form, select it from the section’s menu. If you want to make any changes, you will see the “edit” option by hovering the mouse over the form.
6. Add a Footer
The Footer of a website usually contains the following things:
- Privacy policy
- Contact information
- Email Sign-up form
- Logo
- Social media icons
 |
| Footer Menu |
Tap the settings icon in the menu. You will see numerous options listed on the left. Navigate to “header and footer” and check the box that says, “Display a footer at the bottom of the page?”
7. Connect a Custom Domain
Having a custom domain is crucial as it helps build trust with your audience. It will also help your website rank and make your site’s name easily memorable.
 |
| Connect Custom Domain |
To connect a custom domain, navigate to settings, then select “domains” from the series of options. There you can either connect to an already purchased domain or upgrade your free Strikingly account to get a free domain for 1 year.
Lastly, preview your site by clicking the desktop or phone icon right above the publish button. Once happy with how your site looks, click on the publish button to go live.
Now that you’ve learned how easy it is to create a website with Strikingly, build your website today and introduce your brand to internet users worldwide.
You may also like to read:
Best Cloud Services for Small Business
Best Automated Crypto Trading Platform
Generate Plagiarism Free content Tutorial
Social Media Marketing Strategy
Digital Marketing Guide for Beginners

ConversionConversion EmoticonEmoticon